
Rod pocket curtains are easy to make and the ones with tape like a drawstring and hooks aren’t much harder.
I have trouble finding curtain fabric I like and have been known through the years to just use whatever fabric I like even if it’s made into another item already. My favourites are doona covers (covers for those wool, cotton, feather or fibre filled bed inserts) as there is a lot of fabric, esp king size and a lot of times both the top and the bottom are printed, even better. They’re generally cotton so can fade or wash out in a couple of years and they don’t keep out all the light when closed so depends on the window and the room and what you’re really after. Cheap and easy you can afford to change more often.
This method also applies to suede back or block out fabric but usually has the drawstring and hooks for your rods the backing can often stick to the rod as the sun is always shining on it.
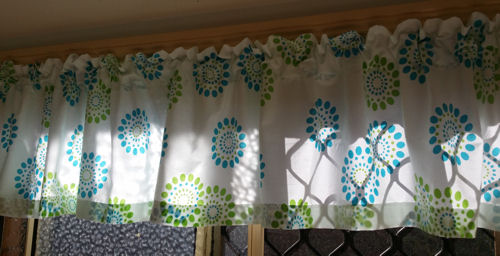
For this pictured curtain/ruffle/valance window topper I used a doona cover.
This method is also used for any length or width of window you just change the measurements and if you can sew a straight line you can easily make curtains. Measure twice and cut once, hang against window for confirmation. DON’T forget to add measurements for your seams at the side, the turn under for rod at the top and the hem at the bottom.
Fabric needed: Measure width of window + 1/3 – 1/2 the width again to give the gathering (depends on how full you want your curtain to be go up to double if you wish, there is no specific amount if you’re making your own just be happy with the gather) Mine was 1.5metre window + 0.5m gather + 3cm side seams + 3cm side seems = 2.06cm total.
Always do your side seems first, about 1.5cm turned under and under (allowance each side 3cm)
Top: Turn under amount to hide the raw fabric edges about 1.5cm + The pocket for the rod, measure the diameter of rod, add a centimetre or so extra to allow the rod to slide (mine was a small/thin rod) and an amount of fabric at the top to give that bit of a ruffle about 2-3cm, my total here was 10cm. Do your stitching row where I’ve pinned, this picture has not had the stitching row done to make the pocket yet. You can see the under and under on left pinned and ready to go and the raw edge on the right to be pinned. Iron to keep flat if needed.
Bottom/hem: Usually what’s left of your fabric within reason, 5cm under and under (total 10cm, give or take a little) is a good measure as once sewn it gives a bit of weight at the bottom to keep curtain hanging straight.

Completed
My doona

It really is quite simple give it a try if you have a sewing machine it’s all straight lines, just take your time until you get the hang of it and you will see how much cheaper making your own curtains really are. This took me just over an hour yesterday and the new colours just changed and updated my bathroom look.
Recent Comments