It’s quite common to cut shapes out of the sheets of craft foam to make your own shaped stamps, this is great to keep the kids occupied. If you’re lucky you can get a bag of pre cut shapes that are probably more intricate than you could cut yourself. Also plenty of letters and numbers in those pre cut bags or draw and cut your own.
If you have shape outline stamps eg: squares, circles, triangles, simple flowers or Christmas trees, you can make your own shading/filler stamp so they complement each other.
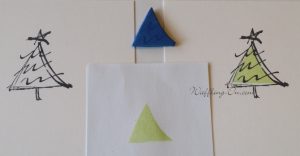
In the example picture below, which may make more sense than my words …
I stamped my christmas tree outline onto the blue craft foam and cut out the shape with scissors just inside the shape line.
Stamp the christmas tree black outline on the card base (card base/card stock gives you a better image than standard print paper).
If you have a clear block (a clear standard flat bottom drinking glass will suffice in a pinch) pop a little thin double sided tape the stamped side of your foam cut out (remember this will be reversed when you stamp) and position the foam shape evenly in the middle of your glass.
Simply stamp your colour in this case green for the tree, to fill in that black outline on your card base.
Carefully take off your foam stamp and pick off any remaining sticky tape bits from your glass or clear block, then wash to reuse. Using this foam for stamping they do only have a limited life but the foam is cheap enough that you can do another.
This tree and method used will be the base of my christmas cards this year, with many being made.


Recent Comments